Thanks for choosing OC Cloud9!

949-699-6619 | 9am – 6pm Monday – Friday : Saturday by Appointment

  • Client Login
    • Outlook Web App
    • Cloud Apps and Desktops
    • Remote Support
OC Cloud9
  • About Us
    • Careers
  • Cloud Services
    • Cloud Software
      • Cloud9 Software QuickBooks Solution
    • Cloud Mail
    • Cloud Collaborate
    • Database Cloud Services
    • Cloud Web Hosting
  • Solutions
    • For Designers – Accelerated
    • For Businesses – Complete
    • For Individuals – Professional
    • HIPAA Compliant Cloud Services
      • Cloud9 HIPAA Email Encryption and Data Loss Prevention
    • For Students – College VDI
  • Support
    • Cloud Support
    • Learning Center
    • Standards & Compliance
    • News & Articles
  • Contact Us
Get Started
  • About Us
    • Careers
  • Cloud Services
    • Cloud Software
      • Cloud9 Software QuickBooks Solution
    • Cloud Mail
    • Cloud Collaborate
    • Database Cloud Services
    • Cloud Web Hosting
  • Solutions
    • For Designers – Accelerated
    • For Businesses – Complete
    • For Individuals – Professional
    • HIPAA Compliant Cloud Services
      • Cloud9 HIPAA Email Encryption and Data Loss Prevention
    • For Students – College VDI
  • Support
    • Cloud Support
    • Learning Center
    • Standards & Compliance
    • News & Articles
  • Contact Us

Android Native Client

OC Cloud9 > Support > Cloud Support > Android Native Client

Android Native Client

How Can We Help?

< Back
You are here:
  • KB Home
  • Cloud9 Exchange Mail
  • Cloud Exchange Device Setup
  • Android Native Client
Print
Created OnNovember 9, 2018
Last Updated OnSeptember 16, 2019
byMatt Jones

The following directions will only work for OCcloud9 customers. This setup is designed for personal Android phones or tablets. Public Android phones and tablets should connect using the Outlook Web Portal.

Mail Setup for Android Devices:
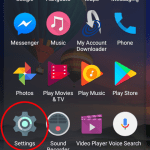
  1. Tap on the “Apps” icon
  2. Tap on the “Settings” icon
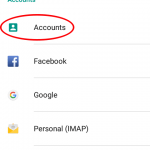
  3. Scroll to and tap on “Accounts” in settings.
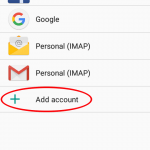
  4. Tap on “Add Account” (Usually at the bottom of the list)
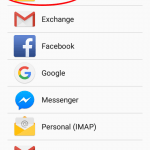
  5. Tap on Exchange. (May also be shown as “Active Sync” or “Cooperate”)
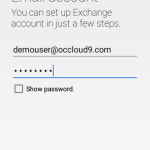
  6. Enter your email address and password and tap “Next.”
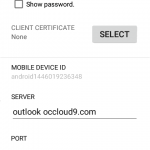
    1. If auto-discover fails, adjust the following settings and tap Next:
      1. Server: outlook.occloud9.com
      2. User Name: Your email address
        (Note in some cases you may need to preference your email address with a backslash “\” in the user name field)
  7. Tap on OK.
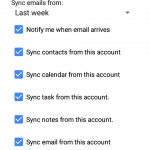
  8. You will now be presented with your “Account options.” Everything will be selected. You can simply tap on “Next,” or you can deselect the options you’d like and then tap “Next.”
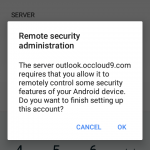
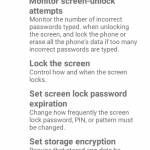
  9. Tap Authorize. (You must agree to this or you will not receive emails)
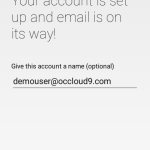
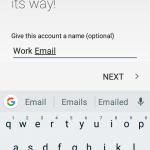
  10. The final page will say “Your account is set up and email is on its way!” It will now as you to give your account a name. You can either keep the default (which will be your email address,” or you can rename it “Exchange,” “Work,” or anything else you’d like. Once you’ve done that, tap “Next.”
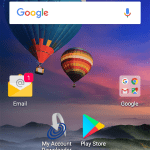
  11. Setup is now complete. You are finished and can now open the email app to see email start to come in.

1. Click on the "Apps" icon 

2. Click on the "Settings" icon 

3. Scroll to "Accounts" in settings and tap on it. 

4. Tap on Add Account. 

5. Tap on Exchange. (May also be shown as "Active Sync" or "Cooperate") 

6. Enter your email address and password 

7. If autodisocover fails enter the information as above. (Note in some cases you may need to preference your email address with a backslash "\" in the user name field) 

8. Tap on OK. 

9. Check the options as you see fit and tap next 

10. Tap Authorize. (You must agree to this or you will not receive emails) 

11. Set the Account name. This is optional and can be anything that makes sense to you. 

12. Tap next. You are finished and can now open the email app to see email start to come in. 

The screenshots shown are from an Android 6 device and will be similar for subsequent versions of Android.

Next Blackberry Phone
Table of Contents

You might also like

  • 3 Hybrid Cloud Service Trends We’ve Seen In 2022
  • 3 Qualities To Look For in Your Managed Cloud Services Provider
  • QuickBooks in the Cloud: The Sky’s the Limit
  • Database Cloud Services in Orange County: Scale at Will
  • QuickBooks Hosting vs. Desktop: Which is Best for Your Business?
  • Distinguishing Between Public, Hybrid, & Private Cloud Solutions
  • Quickbooks Cloud Hosting: How to Lower your IT Budget
  • Access Advanced Disaster Recovery Measures with QuickBooks Hosting
  • Save Money & Scale With a Private Cloud Infrastructure
  • How Secure Cloud Technology Mitigates DDoS Attacks
  • Cloud Security vs. Legacy IT Security: Which Is More Secure?
  • Important Documentation Required For Cybersecurity Insurance
← Windows Client Setup
Blackberry Phone →

Search Help Center Articles

Cloud Complete Icon

Cloud9 Complete

Help Center
Cloud Exchange Icon

Cloud9 Exchange Mail

Help Center
Cloud Apps and Desktop Icon

Cloud9 Apps & Desktops

Help Center
Cloud Exchange Icon

Cloud9 Email Protection

Help Center

26150 Enterprise Way, Suite 400
Lake Forest, CA 92630

949-699-6619

ADA Accessibility Statement

Sign Up To Receive Our Newsletter